Tuesday 11 December 2012

Cranberry, Ginger & Pistachio Christmas Truffles


Christmas baking is the highlight of December for me - apart from Christmas day itself - and I look forward to trying new recipes and playing around with Christmas flavours in treats to give to family and friends. I also (somewhat stupidly) started catering our work Christmas customer night a few years back, so I have a pretty decent collection of nibbles to call on this time of year.

Truffles are up there in my book - small and sweet - enough of an indulgence without inducing a compulsory 5 km run, but all of the flavour and cuteness. This recipe I found in a House & Garden mag when I stayed at a good friend's place, and I have very liberally switched it up to make it more Christmas-sy.

Four batches in and these have been a hit so far, so I highly recommend you find the time in the next 12 days to whip them up as gifts or just a nice treat on Christmas day.


Cranberry, Ginger & Pistachio Christmas Truffles 


Makes about 40

250g (1 packet) wine biscuits
12 dried apricots, diced
8 pieces crystallised ginger, diced
1/3 cup dried cranberries, diced
70g pistachios, chopped
1 tsp cinnamon
1 tsp ground ginger
1/2 tsp mixed spice
100g butter, melted
1/2 can sweetened condensed milk

For decoration:
1 bag white choc melts
chopped pistachios
chopped cranberries
silver balls

Crush biscuits to coarse crumbs in a food processor. Add all remaining ingredients, and blitz until mixture  is even and comes together.

Using dampened hands, roll into small walnut-sized balls, place on a tray and chill in freezer for at least 30 minutes. You can leave in the freezer for longer if needed, and ice them from frozen when you are ready.

Melt chocolate in microwave in short bursts on medium, stirring regularly. Dip each truffle ball into the chocolate, place on baking paper or a silicone sheet, and sprinkle chopped cranberries, pistachios and silver balls over the top before the chocolate sets.

Store in an air-tight container for a few days, or keep in the freezer for longer.

The dipping is much easier to do if you keep the balls frozen - don't let them get too warm - and use a dipping coil.

I make two batches at a time - one after the other in the processor, then roll the whole lot into balls and dip. Trust me - you are going to want to stock up on the ingredients for these!


Treats for our customers - truffles, smoked salmon & creme fraiche blini, brownie bites with fresh raspberry buttercream, mini red velvet cupcakes and strawberry & lemon marscapone tartlets

Thursday 29 November 2012

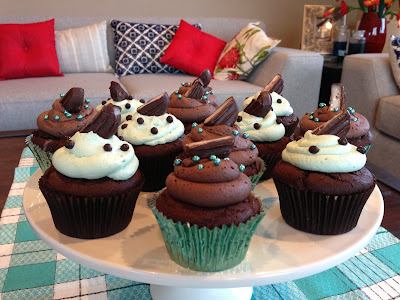
After Dinner Mint Cupcakes


The rich and fresh combination of Chocolate and Mint seemed the perfect way to ease myself into Christmas baking, so last week I made these delicious cupcakes for the birthday shout for one of my staff, Stacey.

I have had these in my head to make for a long time, and have subconsciously collected various amounts of mint colour wrappers and baubles for such an occasion as this. I love love love chocolate and mint - I always pick the mint chocolates first out of a chocolate box, and cherished my supplies of York peppermint patties every time Matt came home from the USA. While musing on these treats, I thought isn't it interesting how the best flavour combinations are also so visually appealing -  these mint green and chocolate brown cupcakes create a beautiful contrast.


It just so happens they taste as good as they look - rich, tender chocolate cupcakes with an minty surprise in the middle, with fresh choc-mint icing. Perfect after dinner, or before....up to you :)

After Dinner Mint Cupcakes


Makes approx. 16 cupcakes


Ingredients

1 1/2 cups plain flour
3/4 cup dutch-processed cocoa powder
1/2 teaspoon baking soda
1/2 teaspoon baking powder
1/2 teaspoon salt
115g unsalted butter, softened
1 cup caster sugar
2 eggs
1 teaspoon vanilla
1 cup sour cream or greek yoghurt
1 bag of Cadbury After Dinner Mints


Preheat the oven to 180 degrees. Line a muffin pan with paper liners; set aside (I chose half chocolate brown paper liners, half mint green foil liners)
In a medium bowl, sift together flour, cocoa, baking soda, baking powder, and salt; set aside.
In a large bowl, or the bowl of a standing mixer, cream together the butter and sugar until light and fluffy, then add vanilla.. Add the eggs, one at a time, beating until just combined. 
Sprinkle 1/3 of the flour mixture into the mixing bowl and mix until just combined. Add half of the sour cream or yoghurt, mixing until just combined. Repeat, alternating the remaining flour and yoghurt until just mixed together.
Place 1 1/2 tablespoons of batter into each prepared muffin cup. Lay an after dinner mint in each cup and press down gently. Place another 1 1/2 tablespoons of batter on top of each patty, you want them to be about 3/4 full. Bake for 15 to 18 minutes, until the tops of the cupcakes spring back lightly when touched.


Transfer to a wire cooling rack and allow to cool completely before frosting.


Mint Buttercream and Choc/Mint Buttercream frosting


Ingredients

200g unsalted butter, at room temperature

450g icing sugar, sifted

1 teaspoon vanilla extract or paste

2 tablespoons milk

1/4 teaspoon salt

1 teaspoon peppermint extract

Food coloring

Dutch-processed cocoa
To make the frosting: In a large bowl, or the bowl of a standing mixer, beat the butter for about 30 seconds. Beat in the sugar and salt until combined. Add 1 tablespoon milk and whisk on high for 3 to 4 minutes, until light and fluffy. If the frosting is too thick, add more milk, 1/2 teaspoon at a time, until desired consistency is reached. Remember you want it to be relatively thick so it will hold when you pipe it. Whisk in the peppermint extract - you may want to start with half a teaspoon, and add more to taste, depending on how 'minty' you want your icing to be.
Divide the frosting into 2 parts, leave one part in the mixer bowl and put the rest into another small bowl.
To make the mint green icing, add a TINY amount of Wilton Aqua gel food colouring, or a drop of green and blue normal colouring. Remember you can always add more colour but you can't take it out! Mix well together until uniform in colour.
To make the choc mint icing, add about 3 tablespoons of dutch-processed cocoa, and beat again until fully mixed. Add more or less cocoa depending on how dark you want your icing.

To decorate these cupcakes, I piped on the frosting with a Wilton 1A open circular tip, icing the mint liner cupcakes with the choc-mint icing, and the brown liner cupcakes with the mint green icing. Sprinkle aqua baubles on the choc iced ones, and I used Valhrona Crispy Chocolate pearls on the mint ones (These are so yummy!)
Cut your remaining after dinner mints in half, and press a half into the top of each cupcake.
Voila! 


Friday 16 November 2012

Crunchy Lemon & Poppyseed Muffins

I find you can't go past good ol' Alison Holst for a completely delicious, and reliable, muffin recipe. I like a bit of Kiwi representation too, and I read her autobiography with great interest and a lot of salivation. You can't get much more nostalgic than Alison's Lemon muffins - I dig the 90's vibe and memories of coming home after school to Mum's baking.


Mum has always made Alison's Crunchy Lemon Muffins, which are very good in themselves, but I can't go past the extra crunch of the poppyseed version. Fresh, light, zingy, crunchy, sweet - perfect afternoon tea.

These were made for some of the local Waipa Networks linesmen - they kindly lent us an electrical reel which is masquerading as a Christmas tree table in the Pharmacy right now. I did a rather large amount of baking for them, so hopefully they will remember that when I call in the next favour :)

Crunchy Lemon & Poppyseed Muffins

Adapted from Alison Holst's 100 Favourite Muffins & Slices

2 cups self-raising flour
1 cup sugar (normal, non-caster is fine here as you are not creaming with butter)
1/2 cup poppyseeds (Fruit monster has a great range of nuts, seeds and spices - way cheaper than buying heaps of the little boxes)
finely grated rind of 2 lemons (Have you brought a microplane yet?)

100g butter
2 large eggs
1/2 cup milk
1/2 cup yoghurt (another Vicki Waterhouse trick - yoghurt in anything makes it so much more tender)

Juice of 2 lemons
1/2 cup sugar

Heat oven to 190 degrees fanbake (or 200 normal).

Sift flour into a large bowl, add poppyseeds and sugar, and whisk to combine. Add grated lemon rind.

Microwave butter until just melted, add the eggs, milk and yoghurt and beat with a fork until well mixed.

Pour the liquids into the dry flour mix, and fold together with a fork until the flour is dampened - small bits of flour is ok, you do not want to beat until smooth or over-mix muffin batter.

Spoon mixture into 12 regular muffin pans which have been lightly sprayed with oil.

Bake 10-15 minutes until golden brown, smelling delicious and the centres spring back when pressed.

While they cook, mix together the lemon juice and half cup of sugar - don't dissolve though, as you want the crunchy sugar crystals to remain.

Cool the muffins in the pan for 3-4 minutes, then removed and brush entire surfaces with the lemon sugar glaze.

These are nice and quick to make, so I can whip these up before work pretty easily. They tend to make husbands quite happy too :)

Black white and yellow 

Ready to go in the oven
My kitchen helpers - the cutest cup measure set ever!


Sunday 11 November 2012

Middle Eastern Salad

Me and Lester are trying to cut back on carbs at dinner time (baking is *kinda* excluded from this rule), so you will probably see quite a few salad recipes on this blog. This is a fave of ours, mainly thanks to the Dukkah encrusted chicken and the sweet salty Haloumi. This also makes good use of Pomegranate Molasses and Tahini, two essential Middle Eastern ingredients that I'm always looking for new recipes for.


This may look quite complicated, but it's all pretty simple really - you can take out some ingredients and steps if you need this in a hurry. I never cut corners if it's going to make it taste better, but that's me...and this salad tastes amazing.

Middle Eastern Salad

For the Salad (Serves 2)
2 boneless, skinless chicken thighs, cut into bit sized pieces (lamb would be great here)
Dukkah (I use Alexandra's Bazaar brand, they have a few different varieties)
Lettuce/mesculun
Watercress
Fresh mint
Half a block of Haloumi, cut into slices
1 piece Rye Mountain bread, torn into strips
Salt
Pepper
EVOO (I used Al Brown's Lemon & Fennel infused oil)
1/4 Telegraph Cucumber, peeled and cut into small chunks
1 Capsicum, cut into strips
Cranberries
Microgreens (optional - radish, sorrel, pea shoots)
Baby or normal carrots (2 normal or 4 baby)
Ground Cumin
Honey

Dressing
2 teaspoons Tahini (Sesame seed paste)
3 Tablespoons Greek Yoghurt
1 clove garlic, crushed or microplaned
1 tablespoon Pomegranate Molasses
Juice of 1/2 a lemon
Rind of 1/2 a lemon
Salt and Pepper
1 Tablespoon EVOO
1 Tablespoon water

Preheat your oven to fan bake, 180 degrees.

Drizzle the chicken with olive oil, season with salt and pepper and add about 3 tablespoons of Dukkah and mix well to coat the chicken. Place chicken pieces on a baking paper lined tray and fan-bake until cooked and golden.

Cut the baby carrots into quarters lengthwise, drizzle with EVOO, a little bit of honey, a dusting of ground Cumin, Salt and Pepper, and add to chicken tray about half way through.

Drizzle Mountain Bread strips with EVOO, season, and add to chicken tray when chicken and carrots are almost cooked.

For the dressing, mix together all ingredients in a small bowl until smooth. Season to taste.

When your chicken is cooked and starting to colour, your carrots are tender-crisp and the mountain bread golden, remove from oven and let cool a little.

Fry the haloumi in a medium pan with EVOO until golden on both sides.

Assemble your salad with the lettuce, mint, capsicum, cucumber, and cranberries, adding the hot ingredients last and drizzling the dressing generously over. Top with microgreens, then lasty the hot Haloumi straight from the pan (give it a quick squeeze with a lemon first, it really makes the Haloumi sing)

Chicken, Mountain Bread and Yellow Carrots roasting up nicely
mmmm....can't beat Haloumi


Friday 9 November 2012

Roasted Rhubarb & Apple Compote


I am a complete porridge addict. I think I have had porridge for breakfast, almost without fail, since about April. I loathe the day it is too hot to have porridge (and then I plan on swapping to Bircher, when I master a recipe for that). So it stands to reason I like to mix it up and have delicious toppings on my porridge each day, my favourite of which is Roasted Rhubarb & Apple Compote. Equally delicious served with your favourite Muesli, it is divine straight from the oven with a dollop of greek yoghurt.

I make this at least once a week, and it might do me 4-5 breakfasts. It's pretty easy to whip up when you have the oven on for something else. I have a very big oven, so I am often looking for another reason to turn it on - I think this comes from my Seymour/Nana/WW2 heritage....I'm blaming my mother anyway (but I think it's a good trait to have!)

It keeps well in the fridge, and is actually pretty good cold too. It's a nice way to use up some not-so-fresh apples that didn't pass Lester's "Fresh Apple Flick' test too :) I find the rhubarb texture is much nicer roasted in the oven than cooked on the stovetop into a mush too.

Roasted Rhubarb & Apple Compote


5-10 sticks of Rhubarb (quantities are not so important here, add a bit more sugar if use a lot of Rhubarb)
4-5 apples
1/2 cup brown sugar
2-3 teaspoons cinnamon
Rind and Juice of 1-2 oranges
4 Tablespoons Hakanoa Ginger Syrup (or water). Hakanoa is available at Red Kitchen, Vetro, Farro etc type stores and tastes like liquid gingerbread...mmmm.
Optional - vanilla extract - I don't bother as I always put vanilla in my actual porridge mix.
Optional - raisins or sultanas (credit to mum for this wee addition)

Cut the rhubarb into 1-inch lengths - you want it to stay in pieces, not disintegrate into mush. Core and ut the apples into thickish slices - I leave the skin on as it helps it keep it's shape.
Put into a roasting dish - I use a rectangular glass one - and cover with the brown sugar, cinnamon, orange rind and juice, and the ginger syrup. Mix around to cover the fruit evenly.

Roast in an 180 degree oven for about 30 minutes, stirring once to coat the fruit in the cooking juices. The fruit will colour up a bit, and the juices will thicken up and make a nice syrupy sauce.


The best part - you need to do a little quality control. Have a nice little bowlful hot from the oven with greek yoghurt and slivered almonds. Delicious.


 I make my porridge with a ratio of 2/5ths wholegrain/jumbo oats, 2/5ths rolled oats, 1/5th white quinoa. Soak overnight with water, then cook with about 1/2 cup milk per cup of oat mix until quinoa is no longer opaque. Stir in vanilla extract and about 3 tablespoons LSA mix at the end. So yummy and good for you too - this is low GI and high protein. I make up a cup of oat mix at a time, and that is enough for 4 servings - I just microwave to reheat.

The best way to start your day - trust me - I wake up in the morning and can't wait to tuck into this!

Monday 5 November 2012

Very Chocolate Afgans


I got home from a long day at work on Saturday and found the husband pining after biscuits. Of course, I jumped at the chance to break out the new KitchenAid. Lester thought that all sounded like way too much hard work after my day at work, but for me, the 15 minutes baking these treats was enough to relax and unwind after a full on day... I have to keep reminding him that this is my relaxing hobby :)

Anything containing breakfast cereal as an ingredient is always going to sound a bit like a children's lunchbox treat, so I make my afghans slightly more 'adult' by taking the chocolate up a notch. You don't need actual chocolate to do this - just some decent Dutch-processed Cocoa - Equagold is my favourite, or Valhrona do a great one too. Just compare the colour to your old cocoa and you'll see why this stuff is the business for making your baking rich and very very chocolately.

I also add Vanilla paste to the biscuit and the icing, and that really brings out the chocolate flavour further.


Chocolate Afgans

Adapted from The Edmonds Cookbook

For the Biscuits:
200g unsalted Butter, at room temperature
1/2 cup Caster Sugar
1 cup Plain Flour
1/2 cup Dutch Cocoa powder
pinch of salt
1 tsp Vanilla paste or real vanilla extract
2 cups Cornflakes

For the Icing:
25g unsalted Butter, melted
4 tablespoons Dutch processed Cocoa
1/2 teaspoon Vanilla Paste
2 tablespoons hot water
2 Cups Icing Sugar
Thread coconut

Directions:

Preheat your oven to 170 degrees fanbake (or 180 degrees normal)

Cream the butter and sugar with a hand mixer, or preferably in the bowl of a stand mixer, until really light a fluffy - a good 5-10 minutes or whatever your arm can handle. Add salt and vanilla and beat again.

Sift flour and cocoa into butter mixture, and mix with a spatula or wooden spoon until almost incorporated. Add cornflakes and mix again.

Roll tablespoon-fuls into balls on a lined oven tray, and press gently with a fork.

Bake for about 15 minutes, or until set. You want to avoid them getting brown or burnt (which is suprisingly easy to do when they so dark from the cocoa), so keep checking from about 10 mins onwards, and remove as soon as they have firmed up.

Transfer to a cooling rack, and ice when cool.

To make your icing - mix the melted butter, vanila, cocoa, icing sugar and hot water together, adding more water and/or icing sugar as needed to make the right consistency (quite stiff). You also want it to be as dark as the biscuits, so add more cocoa if needed. It really helps if you sift your icing sugar first, then you get a really smooth icing.

Ice the biscuits with a generous amount of icing (I piped mine on to get a smooth finish), and top with coconut thread.

Warning - these are completley addictive - and very very good with a cup of tea. We finished these off last night watching Homeland, and I almost want to leap up now and make another batch!


Worth your investment - Equagold Dutch Cocoa and Heilala Vanilla Paste. These Breville scales are awesome too.
This is the colour your creamed butter and sugar should be - this will make them  melt in your mouth
All ready to be rolled
Fresh out of the oven


Strawberry Chicken Salad

This is one of those 'just trust me' recipes - savory and sweet can co-exist on your dinner plate. I know - it may sound a bit freaky, but this salad really works. This was our post-gym (Gem) and post wind-trainer (Lester) dinner whipped up in a hurry, and we just happened to have everything on hand.

One thing I really enjoy about cooking, and reading about cooking, is looking at flavour combinations. This is why this salad is a winner - balsamic dressing - strawberries - almonds - chicken - crisp lettuce - avocado - creamy goats chèvre - asparagus - see? They all work so well together. I also added some mountain bread crisps for a bit of added crunch.


Lester even loved it, and usually he would throw me confused looks at the thought of fruit in a salad :)

Strawberry Chicken Salad

Serves two

2 boneless skinless Chicken thighs, cut into bite sized chances
Good quality extra virgin olive oil
Balsamic vinegar & or/ Balsamic reduction
Salt & pepper

1 piece Rye (or other variety) Mountain Bread -  a low carb, really thin wrap style bread.
Sliced Almonds
Avocado, cut into chunks
Lettuce
Cucumber, cut into chunks
about 3 large Strawberries, sliced
Asparagus, (about 3 spears per person), cut into thirds
Goat's cheese (chèvre) - about a third of a roll, crumbled.

Directions:

Preheat the grill to about 180 degrees (fan grill if you have it)

Drizzle a good slosh of Olive oil and Balsamic Vinegar (I used reduction) over the chicken and season well.

Tear the mountain bread into strips, drizzle sparingly with olive oil and season. Rub with your fingers to speed the oil over the bread.

Put your almonds and bread strips onto an oven tray, and put under the grill under crisp and golden brown (about 5 minutes). Transfer into a bowl to cool.

Now put the chicken pieces onto the tray, and grill for about 10 minutes until almost cooked and starting to brown.

Drizzle the asparagus with olive oil, season, and add onto the tray with the chicken for  a further 5 minutes, until the chicken is cooked and the asparagus is nicely roasted.

Make your salad dressing - about 1.5 tablespoons of Balsamic vinegar, 4 tablespoons Olive Oil, Salt, Pepper and minced garlic (1 small clove, ideally rubbed through a microplane). Shake together in a small jar.

Dress your salad leaves with about two-thirds of the salad leaves, then place the leaves on a plate and top with the rest of the ingredients - the asparagus, strawberries, cucumber, mountain bread crisps, toasted almonds, avocado, chicken and crumbled goats cheese.

Drizzle with remaining dressing, and serve.


Monday 29 October 2012

Red Velvet Cheesecake Brownies

So I'm not going to win any points here for variety (yet...give me some time), but seeing as Hayley commented and asked for the recipe for the sneaky picture at the end of my last post, I'm indulging you all again with some Red Velvet goodness.

Trust me, it is completely acceptable to bake these the same day as Red Velvet Cupcakes. Plus, you just feel SO good using ingredients twice in one go (food colouring - I'm looking at you)

These were for Aimee's mum Jackie, who was a stunning model for our makeup night at work a few weeks ago.

These tick all the right boxes - brownies - tick! Red velvet - tick! Cream cheese - tick! It's the perfect match if you ask me :)


Red Velvet Cheesecake Brownies


Ingredients:
120g unsalted butter
60g dark chocolate, coarsely chopped (I used Cadbury Old Gold). I know this doesn't seem like much, but remember Red Velvet is only supposed to have a hint of chocolate.
1 cup sugar
2 large eggs
1 tsp vanilla extract or paste
1 1/2 teaspoon red food coloring
2/3 cup plain flour
1/4 teaspoon salt
250g Philadelphia cream cheese, room temperature
1/3 cup sugar
1 large egg

1 tsp vinegar
1/2 tsp vanilla extract or paste

Directions:

Preheat oven to 180C. Butter or spray-oil the bottom and sides of a brownie or slice pan (just your normal sponge-roll sized one). Put a long piece of baking paper in the pan, extending up the sides so you can lift the whole brownie out afterwards.

In a small, heatproof bowl, melt butter and chocolate together (I did this stove-top, but you could microwave in short bursts) Stir until combined and very smooth. Set aside to cool for a few minutes.
In a large bowl, whisk together sugar, eggs, vanilla extract, vinegar and red food coloring (preferably use your brand new KitchenAid mixer :). Add chocolate mixture and stir until smooth. Add flour and salt and stir until just combined and no streaks of dry ingredients remain.
Pour into prepared pan and spread into an even layer.
To prepare cheesecake mixture, beat cream cheese, sugar, egg and vanilla extract in a medium bowl until smooth. Distribute the cheesecake mixture in 8 dollops over batter in the pan. Swirl in with a knife or spatula.
Bake for 35-40 minutes, until brownies and cheesecake are set. Watch out that it doesn't get too brown - it looks prettier on the cheesecake part if it stays cream coloured.

A knife inserted into the cheesecake mixture should come out clean and the edges will be lightly browned.
Let cool completely in pan on a cooling rack before lifting out the parchment paper to remove the brownies. Careful - it's pretty soft and delicate.


Cut up and devour. I highly recommend cutting of the edges, then cutting into squares (because then you get to eat all the edges - bonus!)

Don't you love the colour? This would be great at Christmas. Actually, I think i'll put this straight onto the Doctor's Christmas Shout list.
Enjoy, 
Gem

Saturday 27 October 2012

Red Velvet Cupcakes

Of course, I had to kick off this blog with my Red Velvet Cupcakes, as they would easily be the most commented on sweet treat I make - I love the flavor - sweet, tangy, with a  hint of chocolatey goodness - moist texture, and creative options when decorating with Cream Cheese Frosting (got to be my favourite frosting for sure!). They are also really easy, as you don't have to melt anything/heat anything/cream and butter & sugar.


I made these cupcakes for quite a few people - if I am doing a baking marathon, I usually like to bless/feed as many people as possible! So one batch of these went to my workmate Ann, and the rest went to Lester (husband, consumer of many calorie laden treats) and also as a thank you to my hairdresser.

I found this recipe on Pinterest (yes - completely addicted), and someone commented on my pin that they were really good - hence this recipe won against the other 101 versions on Pinterest.


Red Velvet Cupcakes 

Recipe from Annie's Eats 
Makes 24 standard sized cupcakes

Ingredients:
For the cupcakes:
2½ cups plain flour
1½ cups caster sugar
1 tsp. baking soda
1 tbsp. cocoa powder (I always use Equagold Dutch cocoa)
1 tsp. salt
2 large eggs
1½ cups vegetable oil (Grapeseed for me)
1 cup buttermilk
2 tbsp. liquid red food coloring
1 tsp. vanilla extract or paste (Heilala Vanilla Paste is amazing)
1 tsp. white vinegar

For the frosting:
1 Block (250g) Philadelphia Cream Cheese, (coolish)
50g unsalted Butter, just soft enough to beat (Mainland do an unsalted one in NZ)
2 tsp. vanilla extract - or paste if you don't mind the little black vanilla flecks.
3 cups icing sugar, sifted

Directions:

Preheat the oven to 180 degrees C.  Line 24 cupcake pans with paper liners.  

In a medium bowl, combine the flour, sugar, baking soda (sift this in!), cocoa powder and salt; whisk to blend. 
In the bowl of an electric mixer, combine the eggs, vegetable oil, buttermilk, food coloring, vanilla and vinegar.  Beat on medium speed until well blended.  Mix in the dry ingredients on low speed and beat until smooth, about 2 minutes.
Divide the batter evenly between the prepared liners (see below for my tip on this).  Turn oven onto fan-bake if you have it, and turn down slightly to 170-ish degrees. Bake, rotating the pans halfway through baking, until a toothpick inserted in the center comes out clean, about 18 minutes.  Let cool in the pans 5-10 minutes, then transfer to a wire rack to cool completely.

To make the frosting, combine the cream cheese and butter in the bowl of an electric mixer (or with a hand mixer).  Beat on medium-high speed until well combined and smooth, about 2-3 minutes.  Mix in the vanilla extract.  Gradually beat in the icing sugar until totally incorporated, increase the speed and then beat until smooth. Chill for a bit in the fridge if you think it needs to firm up a bit before frosting.  Frost cooled cupcakes as desired. (I used a Wilton 2B tip to pipe these cupcakes.)

My new gadget - an ice-cream scoop (with the bit that scoops it out when you press the handle together) makes putting the cupcake batter in so much easier! = less mess, and even sized cupcakes

Out of the oven - freshly baked deliciousness

All packed up and ready to go!


So if you want to create the 'rosy' swirl, paint gel food coloring down the inside of the piping bag in 3 vertical stripes. I used Wilton 'Red Red' gel coloring. Fill your bag with icing, then pipe from centre outwards to create a rose effect.

I actually froze these cupcakes, and iced a different day - they freeze very well un-iced.


I also made some Red Velvet Cheesecake Brownies: They were REAL good!


A new start...

Hello readers - friends, family, hungry people...

I have long been an avid reader of blogs, especially those of the food variety, so I thought heck - let's get some work/life balance going here, and give myself a new creative outlet.

So here goes - welcome to Savour and Devour - my little part of the world (wide web) to share the recipes, ingredients, authors, people, restaurants that have been inspiring me lately, and putting good food on our table and on those of the people we care about.

I will try and keep this relatively mixed, but we all know I have a sweet tooth...

Enjoy - and thanks so much for stopping by.

Gem